So, here's the deal. You’ve built yourself a sweet IoT setup running on Ubuntu, but there’s one big problem—your devices are stuck behind a firewall. How do you access them remotely without compromising security or losing your mind? Let me tell ya, remote SSH access is a game-changer. It’s like having a secret tunnel that lets you control your IoT devices from anywhere in the world. And that's exactly what we’re gonna talk about today. Remote SSH IoT behind firewall Ubuntu example is more than just tech jargon—it’s your ticket to freedom.
Now, I get it. Firewalls can be a real pain in the neck. They’re there to keep your network secure, but sometimes they make life unnecessarily complicated. But don’t sweat it. With the right setup and a few clever tricks, you can easily SSH into your IoT devices even if they're behind a firewall. This guide will walk you through everything you need to know, step by step, so you can focus on building cool stuff instead of wrestling with network issues.
Before we dive deep, let’s set the scene. Imagine this: you're sipping coffee in your favorite café while your IoT devices are humming along back at home. You need to check on them, tweak some settings, or troubleshoot an issue. Remote SSH access makes all of that possible. So buckle up, because we’re about to turn this tech challenge into a walk in the park.
Read also:Emily Santtt Erome The Rising Star You Need To Know
Why Remote SSH Access Matters for IoT Devices
Let’s cut to the chase. SSH (Secure Shell) is the golden ticket for remote access. It's like a secure handshake between you and your devices, allowing you to manage them from afar without exposing your network to hackers. When it comes to IoT devices, SSH is especially important because these gadgets often lack built-in security features. By setting up remote SSH access, you’re not just gaining control—you’re also adding a layer of protection.
But wait, there's more. IoT devices behind firewalls are often unreachable from the outside world. Firewalls block incoming connections to keep your network safe, but that also means you can’t SSH into your devices unless you jump through a few hoops. Luckily, there are solutions that let you bypass these restrictions without compromising security. We’ll cover those later, but first, let’s break down why SSH is such a big deal.
Key Benefits of Using SSH for IoT Devices
- **Secure Communication:** SSH encrypts all data exchanged between you and your IoT device, keeping sensitive information safe from prying eyes.
- **Remote Management:** With SSH, you can manage your IoT devices from anywhere, whether you're at home, at work, or chilling on a beach somewhere.
- **Automation Capabilities:** SSH can be integrated with scripts and automation tools, allowing you to perform repetitive tasks without lifting a finger.
- **Cost-Effective:** Unlike proprietary solutions, SSH is free and open-source, making it an affordable option for hobbyists and professionals alike.
Understanding Firewalls and Their Impact on Remote Access
Firewalls are like the bouncers at a club—they decide who gets in and who stays out. While they’re great at keeping unwanted traffic at bay, they can also block legitimate connections, including SSH sessions. This is especially true for IoT devices, which often operate on private networks with limited external access. If you want to SSH into your IoT devices, you’ll need to find a way to bypass the firewall without leaving your network vulnerable.
Types of Firewalls and Their Challenges
- **Software Firewalls:** These are programs installed on individual devices or servers. They’re great for controlling traffic at the device level, but they can be tricky to configure for remote access.
- **Hardware Firewalls:** These are standalone devices that protect entire networks. They offer robust security but can be difficult to configure for specific use cases like SSH.
- **Cloud Firewalls:** Managed by cloud providers, these firewalls offer flexibility and scalability but require careful configuration to allow remote access.
Each type of firewall has its own set of challenges, but the good news is that there are solutions for all of them. Whether you’re using a software firewall on your Ubuntu machine or a hardware firewall protecting your home network, we’ve got you covered.
Setting Up SSH on Ubuntu for IoT Devices
Alright, let’s get our hands dirty. The first step in setting up remote SSH access is configuring SSH on your Ubuntu device. This involves installing the SSH server, configuring it for your IoT setup, and testing the connection to make sure everything works as expected. Don’t worry—it’s easier than it sounds.
Step 1: Install the SSH Server
To get started, you’ll need to install the OpenSSH server on your Ubuntu machine. Here’s how you do it:
Read also:Unlocking The Power Of Lube Match Shell Shell Oil Selector Your Ultimate Guide To Optimal Lubrication
- Open a terminal on your Ubuntu device.
- Type the following command and hit Enter:
sudo apt update && sudo apt install openssh-server. - Wait for the installation to complete. Once it’s done, SSH will be ready to go.
Step 2: Configure SSH for IoT Devices
Now that SSH is installed, it’s time to tweak the configuration to suit your IoT setup. Here’s what you need to do:
- Open the SSH config file using this command:
sudo nano /etc/ssh/sshd_config. - Look for the line that says
Port 22and change it to a non-standard port (e.g., 2222). This makes it harder for hackers to find your SSH connection. - Scroll down and make sure the line
PermitRootLogin nois uncommented. This prevents root login, adding an extra layer of security. - Save the file and restart the SSH service using this command:
sudo systemctl restart ssh.
Port Forwarding: The Classic Solution
If your IoT devices are behind a hardware firewall, port forwarding is one of the simplest ways to enable remote SSH access. It works by redirecting incoming traffic on a specific port to your IoT device’s internal IP address. Here’s how you can set it up:
Step 1: Log in to Your Router
Most routers have a web-based interface where you can configure port forwarding. To access it:
- Open a browser and type your router’s IP address (usually something like 192.168.1.1) into the address bar.
- Log in using your router’s admin credentials.
Step 2: Set Up Port Forwarding
Once you’re in the router’s settings, follow these steps:
- Find the section labeled “Port Forwarding” or “Virtual Servers.”
- Add a new rule, specifying the external port (e.g., 2222) and the internal IP address of your IoT device.
- Save the changes and test the connection to make sure everything works.
Alternative Solutions: Reverse SSH Tunneling
Port forwarding isn’t always an option, especially if you’re dealing with restrictive firewalls or cloud-based setups. In those cases, reverse SSH tunneling is a fantastic alternative. It works by creating a secure tunnel from your IoT device to a public server, allowing you to access the device remotely without modifying the firewall.
How Reverse SSH Tunneling Works
Here’s a quick rundown of how reverse SSH tunneling works:
- Your IoT device initiates an outbound connection to a public server (which is allowed by most firewalls).
- The server acts as a middleman, forwarding your SSH requests to the IoT device through the established tunnel.
- You can then SSH into the public server and access your IoT device as if it were on the same network.
Best Practices for Securing Remote SSH Access
Security should always be top of mind when setting up remote SSH access. Here are a few best practices to keep your IoT devices safe:
- Use strong, unique passwords or SSH keys for authentication.
- Disable password-based login and rely solely on SSH keys if possible.
- Monitor your SSH logs regularly for suspicious activity.
- Keep your SSH server and firmware up to date to protect against vulnerabilities.
Common Issues and Troubleshooting
Even with the best setup, things can go wrong. Here are some common issues you might encounter and how to fix them:
Issue 1: Unable to Connect
If you’re having trouble connecting to your IoT device, double-check the following:
- Make sure the SSH server is running on your device.
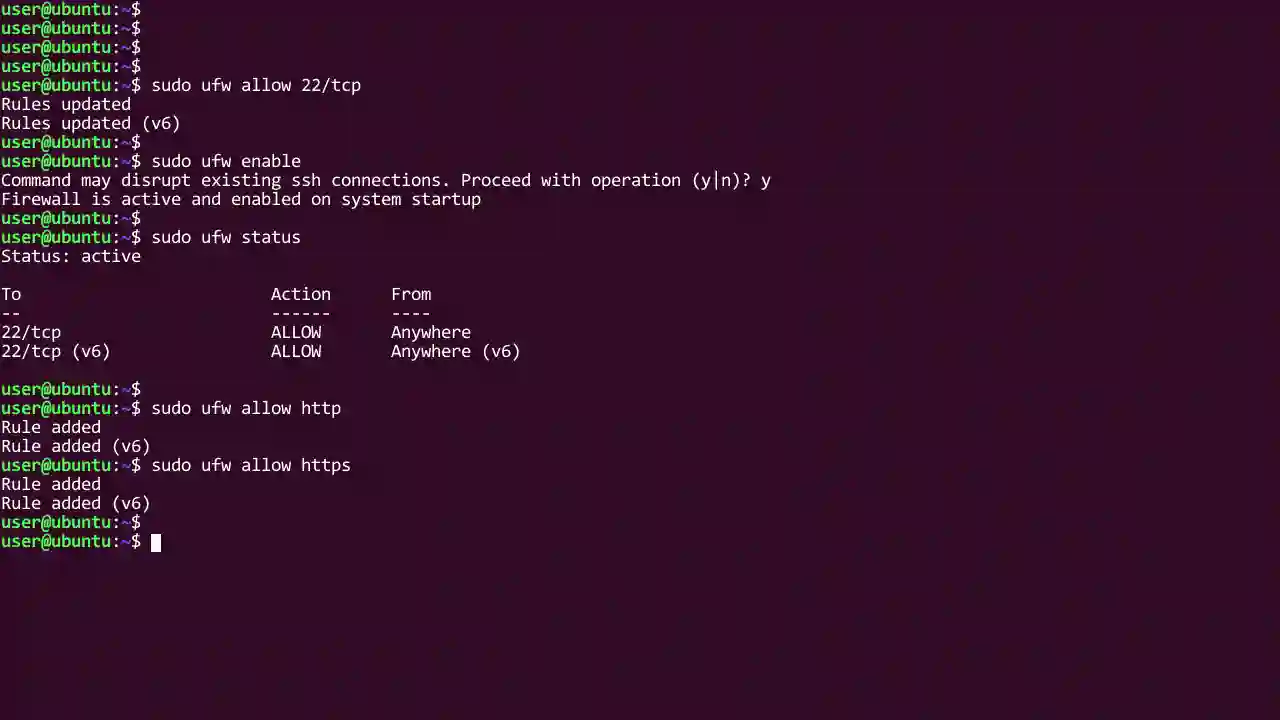
- Verify that the firewall rules allow incoming connections on the specified port.
- Check the IP address and port number to ensure they’re correct.
Issue 2: Slow Connection
A slow SSH connection can be frustrating. Try these tips to speed things up:
- Use a compression algorithm like
Compression yesin your SSH config file. - Switch to a faster internet connection if possible.
- Consider using a local proxy server to reduce latency.
Real-World Example: Remote SSH Access for Home Automation
Let’s put all of this into practice with a real-world example. Imagine you’ve set up a home automation system using Raspberry Pi running Ubuntu. You want to be able to SSH into the Pi from anywhere to adjust settings, check logs, or troubleshoot issues. Here’s how you’d do it:
Step 1: Set Up SSH on the Raspberry Pi
Follow the steps outlined earlier to install and configure SSH on your Raspberry Pi.
Step 2: Configure Port Forwarding
If your router supports it, set up port forwarding to direct traffic to the Pi’s internal IP address.
Step 3: Test the Connection
Use a terminal on your laptop or smartphone to SSH into the Pi using its public IP address and the configured port. If everything is set up correctly, you should be able to access the device without any issues.
Conclusion: Take Control of Your IoT Devices
And there you have it—everything you need to know about remote SSH access for IoT devices behind a firewall on Ubuntu. Whether you’re using port forwarding, reverse SSH tunneling, or another method, the key is to balance convenience with security. Remember, your IoT devices are only as secure as the network they’re connected to, so always follow best practices and stay vigilant.
Now it’s your turn. Have you tried setting up remote SSH access for your IoT devices? What challenges did you face, and how did you overcome them? Leave a comment below and let’s keep the conversation going. And if you found this guide helpful, don’t forget to share it with your fellow tech enthusiasts!
Table of Contents
- Why Remote SSH Access Matters for IoT Devices
- Understanding Firewalls and Their Impact on Remote Access
- Setting Up SSH on Ubuntu for IoT Devices
- Port Forwarding: The Classic Solution
- Alternative Solutions: Reverse SSH Tunneling
- Best Practices for Securing Remote SSH Access
- Common Issues and Troubleshooting
- Real-World Example: Remote SSH Access for Home Automation
- Conclusion: Take Control of Your IoT Devices