Connecting remote IoT devices securely is more than just a tech challenge—it's a necessity in today's interconnected world. Whether you're managing smart home devices, industrial sensors, or edge computing systems, ensuring secure communication between these devices and your Ubuntu server is crucial. In this guide, we'll explore how to set up a peer-to-peer (P2P) SSH connection that keeps your data safe while maintaining optimal performance. Let's dive in!
Imagine this: you've got a network of IoT devices spread across different locations, all needing to communicate with each other and a central Ubuntu server. How do you make sure that data stays secure while avoiding the hassle of traditional client-server models? That's where P2P SSH comes in. It's like giving your devices a secret handshake that only they can understand.
This isn't just about setting up a connection; it's about doing it right. From configuring SSH keys to optimizing firewall settings, we'll walk you through every step of the process. By the end of this guide, you'll have the tools and knowledge to securely connect your remote IoT devices like a pro. So, buckle up, and let's get started!
Read also:Emily Santtt Erome The Rising Star You Need To Know
Table of Contents
- What is Remote IoT P2P SSH?
- Why Choose Ubuntu Server?
- Setting Up SSH on Ubuntu
- Configuring Firewall Settings
- Generating SSH Keys
- Connecting Devices P2P
- Securing Your SSH Connection
- Troubleshooting Common Issues
- Advanced Optimization Tips
- Final Thoughts and Next Steps
What is Remote IoT P2P SSH?
Let's break it down, shall we? Remote IoT P2P SSH refers to establishing a secure connection between IoT devices and an Ubuntu server using the Secure Shell (SSH) protocol in a peer-to-peer manner. Instead of relying on a centralized server, devices communicate directly with each other, reducing latency and improving efficiency. Think of it like a private chatroom where only invited guests can join.
SSH itself is a cryptographic network protocol that ensures secure data communication, authentication, and command execution. When applied to IoT devices, it acts as a digital fortress, protecting sensitive information from prying eyes. This setup is especially useful for scenarios where devices are scattered across various locations, making traditional networking impractical.
Why P2P is the Future
Peer-to-peer architecture offers several advantages over traditional client-server models. For starters, it reduces the load on central servers, making your network more scalable. Plus, it enhances security by minimizing the attack surface. If one device gets compromised, the others remain unaffected. It's like having a team of bodyguards instead of relying on a single security guard.
Why Choose Ubuntu Server?
Ubuntu Server is the go-to choice for many developers and sysadmins when it comes to managing IoT devices. But why, you ask? Well, for starters, it's open-source, meaning no licensing fees to worry about. Plus, its robust security features and vast community support make it a reliable platform for building secure networks.
Another big plus is its compatibility with a wide range of hardware and software. Whether you're working with Raspberry Pi, Arduino, or any other IoT device, Ubuntu Server has got you covered. It's like having a universal adapter that works with everything in your tech arsenal.
Key Features of Ubuntu Server
- Stable and secure environment
- Easy integration with cloud services
- Regular updates and long-term support
- Wide range of supported hardware
Setting Up SSH on Ubuntu
Alright, let's get our hands dirty. The first step in securely connecting your IoT devices is setting up SSH on your Ubuntu server. Don't worry; it's not as complicated as it sounds. Here's a step-by-step guide to help you through the process.
Read also:Debbie Depp Unveiling The Life Legacy And Untold Stories
First things first, you'll need to install the OpenSSH server package. You can do this by running the following command in your terminal:
sudo apt update && sudo apt install openssh-server
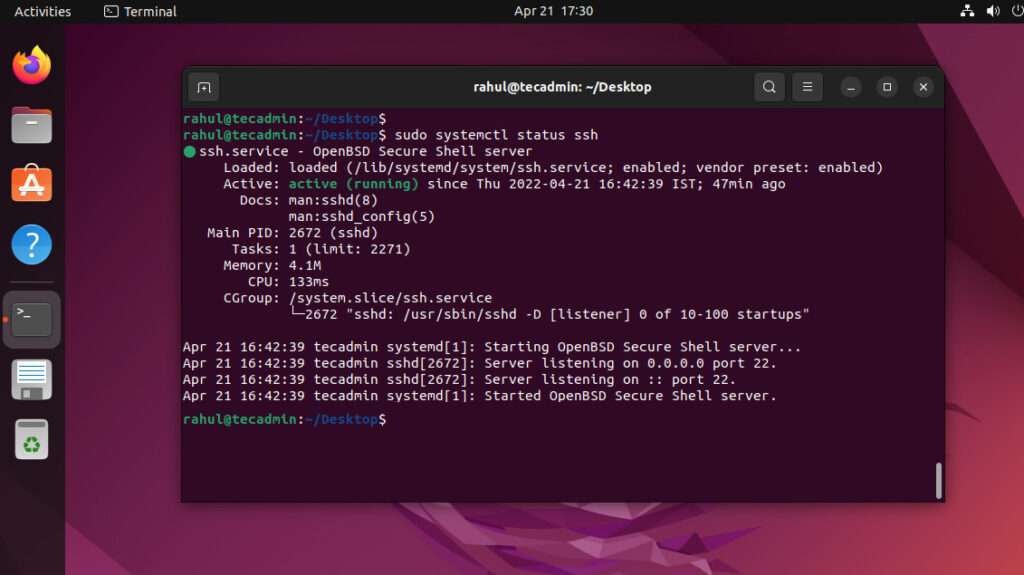
Once installed, you can check if the SSH service is running by typing:
sudo systemctl status ssh
If everything's good, you should see a message indicating that the service is active and running. Congratulations, you've just taken the first step towards securing your IoT network!
Verifying SSH Installation
To ensure that SSH is properly installed and configured, try connecting to your server from another machine using the following command:
ssh username@server_ip_address
Replace "username" and "server_ip_address" with your actual credentials. If you're greeted with a password prompt, you're all set. Easy peasy, right?
Configuring Firewall Settings
Now that SSH is up and running, it's time to fortify your server's defenses by configuring firewall settings. Think of the firewall as a bouncer at a nightclub—its job is to let in the good guys while keeping the bad ones out.
Ubuntu comes with a built-in firewall called UFW (Uncomplicated Firewall). To enable it, simply run the following command:
sudo ufw enable
Next, allow SSH traffic by typing:
sudo ufw allow ssh
That's it! Your server is now protected from unauthorized access while still allowing legitimate SSH connections.
Advanced Firewall Configurations
For added security, consider setting up IP whitelisting. This restricts access to your server to only trusted IP addresses. Here's how you do it:
sudo ufw allow from trusted_ip_address to any port 22
Replace "trusted_ip_address" with the actual IP address you want to allow. You can add multiple IP addresses by repeating the command for each one.
Generating SSH Keys
SSH keys are like digital passports that allow devices to authenticate each other without the need for passwords. Generating them is a simple process that adds an extra layer of security to your network.
To create a new SSH key pair, use the following command:
ssh-keygen -t rsa -b 4096
This will generate a 4096-bit RSA key pair. You'll be prompted to enter a file path to save the key and, optionally, a passphrase for added security.
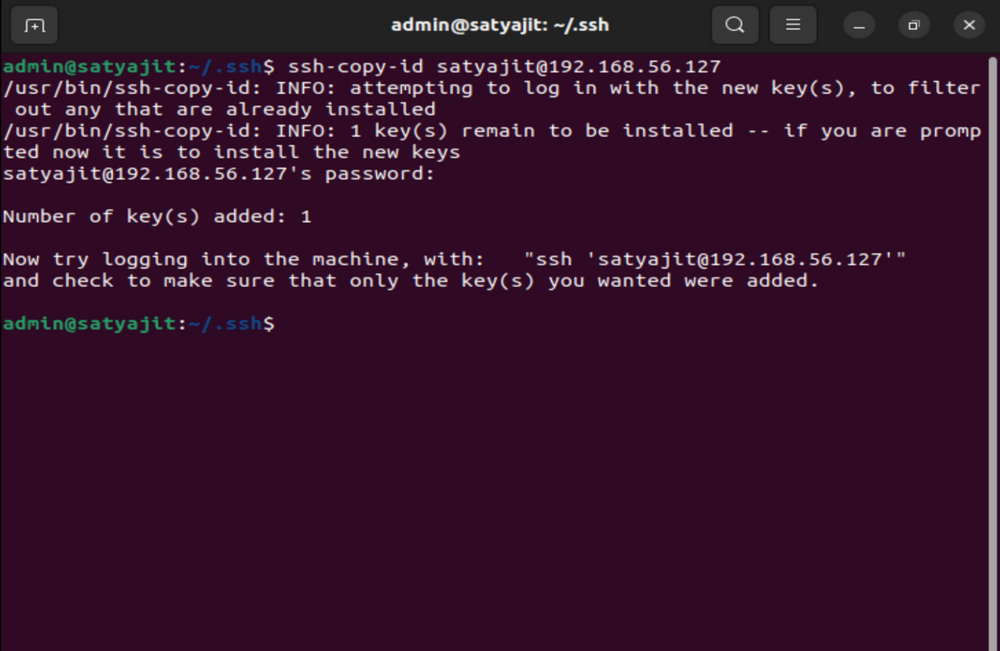
Once the keys are generated, you can copy the public key to your IoT devices by running:
ssh-copy-id username@device_ip_address
Again, replace "username" and "device_ip_address" with your actual credentials. Now, your devices can communicate securely without the need for passwords.
Managing SSH Keys
It's good practice to regularly review and manage your SSH keys to ensure they're up to date and secure. You can list all authorized keys by checking the authorized_keys file:
cat ~/.ssh/authorized_keys
If you need to revoke access for a particular device, simply remove its corresponding key from the file. Easy as pie!
Connecting Devices P2P
With SSH set up and configured, it's time to establish P2P connections between your IoT devices. This involves configuring each device to communicate directly with the others via SSH.
Start by identifying the IP addresses of all devices in your network. Then, configure each device to allow incoming SSH connections from the others. You can do this by editing the SSH configuration file:
sudo nano /etc/ssh/sshd_config
Look for the "PermitRootLogin" and "PasswordAuthentication" lines and set them to "no" to enhance security. Save the file and restart the SSH service:
sudo systemctl restart ssh
Now, test the connection by logging in from one device to another using the SSH command. If everything's set up correctly, you should be able to connect without any issues.
Tips for Efficient P2P Setup
To make your P2P setup more efficient, consider using a tool like SSH multiplexing. This allows multiple SSH sessions to share a single connection, reducing latency and improving performance. You can enable it by adding the following lines to your SSH configuration file:
ControlMaster auto
ControlPath /tmp/%r@%h:%p
Securing Your SSH Connection
Security should always be at the forefront of your mind when setting up an IoT network. Here are some additional tips to help you secure your SSH connections:
- Use strong, unique passwords for each device
- Disable password authentication and rely solely on SSH keys
- Change the default SSH port to something less obvious
- Regularly update your server and devices to patch vulnerabilities
By following these best practices, you'll create a robust and secure network that can withstand even the most sophisticated attacks.
Monitoring and Logging
Keeping an eye on your network's activity is crucial for detecting and responding to potential threats. Ubuntu's built-in logging system makes it easy to monitor SSH connections. You can view the logs by running:
sudo tail -f /var/log/auth.log
This will display real-time updates of all authentication attempts, allowing you to quickly identify any suspicious activity.
Troubleshooting Common Issues
Even the best-laid plans can hit a snag from time to time. Here are some common issues you might encounter when setting up your IoT network and how to fix them:
- Connection refused: Check your firewall settings and ensure SSH is allowed.
- Permission denied: Verify that your SSH keys are correctly configured and that password authentication is disabled.
- Timeout errors: Ensure that your devices are on the same network and that there are no routing issues.
If none of these solutions work, don't hesitate to reach out to the Ubuntu community or consult the official documentation for further assistance.
Advanced Optimization Tips
For those looking to take their IoT network to the next level, here are some advanced optimization tips:
- Implement load balancing to distribute traffic evenly across devices
- Use compression to reduce bandwidth usage
- Configure keepalive settings to prevent idle connections from dropping
These techniques can significantly improve the performance and reliability of your network, ensuring smooth operation even under heavy loads.
Final Thoughts and Next Steps
There you have it—a comprehensive guide to securely connecting remote IoT devices using P2P SSH on an Ubuntu server. By following the steps outlined in this article, you've taken a major step towards building a secure and efficient IoT network.
Remember, security is an ongoing process. Regularly review and update your configurations to stay ahead of potential threats. And don't forget to share your experiences and insights with the community. Together, we can create a safer and more connected world.
So, what are you waiting for? Go ahead and start implementing these tips today. Your IoT devices will thank you for it. And if you found this article helpful, be sure to leave a comment or share it with your friends. Let's keep the conversation going!