Hey there tech enthusiasts! If you're diving into the world of Raspberry Pi, then you're in for a wild ride. The best remote IO Raspberry Pi setup can transform your projects from basic to extraordinary. Whether you're automating your home, controlling robots, or building IoT solutions, remote IO is your golden ticket. So, buckle up because we're about to deep dive into the nitty-gritty of this tech marvel!
Remote IO on Raspberry Pi opens up a whole new realm of possibilities. Imagine being able to control devices from anywhere in the world with just a few clicks. This tech isn't just for hobbyists; it's a game-changer for professionals too. From automating small tasks to managing complex systems, remote IO has got you covered.
Before we jump into the details, let's address the elephant in the room. Why should you care about remote IO? Well, it's all about efficiency, flexibility, and scalability. Whether you're a DIY enthusiast or a professional developer, understanding how to set up and optimize remote IO on your Raspberry Pi can save you time and effort in the long run. Let's get started!
Read also:Erome Lelasohna A Rising Star In The Music Scene
What is Remote IO Raspberry Pi?
Alright, so what exactly is this remote IO thing? Simply put, remote IO allows you to control input and output devices connected to your Raspberry Pi from a remote location. Think of it as giving your Raspberry Pi superpowers to interact with the physical world without being physically present.
Remote IO isn't just about controlling LEDs or motors; it's about creating smart systems that can adapt to your needs. For example, you can set up a remote-controlled irrigation system for your garden or monitor the temperature in your greenhouse from your couch. The possibilities are endless!
Here's the kicker—remote IO isn't as complicated as it sounds. With the right tools and a bit of know-how, you can have your Raspberry Pi up and running in no time. Let's break it down further in the next section.
Why Choose Raspberry Pi for Remote IO?
Raspberry Pi has become the go-to choice for remote IO projects, and for good reason. First off, it's affordable. You don't need to break the bank to get your hands on one. Plus, it's super versatile. Whether you're a beginner or a pro, Raspberry Pi can cater to your needs.
Here are a few reasons why Raspberry Pi stands out in the world of remote IO:
- Powerful Hardware: Raspberry Pi packs a punch with its processing power and GPIO pins, making it perfect for handling multiple tasks simultaneously.
- Open Source Community: The Raspberry Pi community is huge and supportive. You'll find tons of resources, tutorials, and forums to help you along the way.
- Compatibility: Raspberry Pi works seamlessly with a wide range of software and hardware, giving you the flexibility to experiment and innovate.
So, if you're looking for a reliable and cost-effective solution for your remote IO projects, Raspberry Pi is the way to go.
Read also:Lori Poling The Inspiring Journey Of A Woman Who Transformed Challenges Into Triumphs
Setting Up Your Raspberry Pi for Remote IO
Now that we've established why Raspberry Pi is the best choice for remote IO, let's talk about setting it up. The process is pretty straightforward, but there are a few things you need to keep in mind.
Hardware Requirements
Before you start tinkering, make sure you have all the necessary hardware. Here's a quick checklist:
- Raspberry Pi (any model will do, but newer models offer better performance)
- MicroSD card with Raspberry Pi OS installed
- Power supply
- Network connection (Wi-Fi or Ethernet)
- Peripherals like a keyboard, mouse, and monitor (optional)
Once you have all the hardware ready, it's time to move on to the software setup.
Software Setup
Setting up the software is where the magic happens. Here's a step-by-step guide to get your Raspberry Pi ready for remote IO:
- Install Raspberry Pi OS on your MicroSD card. You can download it from the official Raspberry Pi website.
- Enable SSH (Secure Shell) in the Raspberry Pi configuration settings. This will allow you to connect to your Raspberry Pi remotely.
- Connect your Raspberry Pi to your network. You can use Wi-Fi or Ethernet, depending on your setup.
- Install any additional software or libraries you might need for your specific project. For example, if you're working with GPIO pins, you might want to install the RPi.GPIO library.
With these steps, your Raspberry Pi should be ready to rock and roll!
Best Practices for Remote IO Raspberry Pi
Now that your Raspberry Pi is set up, let's talk about some best practices to ensure smooth operation. These tips will help you avoid common pitfalls and make the most out of your remote IO setup.
Security Measures
Security is paramount when it comes to remote IO. You don't want unauthorized access to your Raspberry Pi, especially if it's controlling critical systems. Here are a few security tips:
- Change the default password for your Raspberry Pi. This might seem obvious, but you'd be surprised how many people skip this step.
- Use a strong, unique password that's hard to guess.
- Enable firewall rules to restrict access to your Raspberry Pi.
- Regularly update your Raspberry Pi OS and software to patch any security vulnerabilities.
By following these security measures, you can rest easy knowing your Raspberry Pi is protected from unwanted intrusions.
Optimizing Performance
Performance optimization is key to ensuring your remote IO setup runs smoothly. Here are a few tips to help you optimize:
- Use lightweight software and libraries to reduce the load on your Raspberry Pi.
- Monitor your Raspberry Pi's resource usage and adjust settings as needed.
- Consider using a static IP address for your Raspberry Pi to avoid connection issues.
With these optimization tips, your Raspberry Pi will be running like a well-oiled machine.
Top Tools for Remote IO Raspberry Pi
Having the right tools can make all the difference in your remote IO projects. Here are some of the top tools you should consider:
SSH Clients
SSH clients are essential for connecting to your Raspberry Pi remotely. Some popular options include:
- PuTTY (for Windows)
- Terminal (for macOS and Linux)
These tools allow you to securely access your Raspberry Pi from any device with an internet connection.
GPIO Libraries
If you're working with GPIO pins, you'll need a good GPIO library. Some of the best ones include:
- RPi.GPIO (Python library)
- wiringPi (C library)
These libraries make it easy to control GPIO pins and interact with external devices.
Common Challenges and Solutions
Every project comes with its own set of challenges, and remote IO on Raspberry Pi is no exception. Here are some common challenges you might face and how to overcome them:
Connection Issues
Connection problems can be frustrating, but they're usually easy to fix. Here are a few troubleshooting tips:
- Check your network settings to ensure your Raspberry Pi is connected to the correct network.
- Verify that SSH is enabled and properly configured.
- Try restarting your Raspberry Pi and router to see if that resolves the issue.
With these tips, you should be able to resolve most connection issues in no time.
Real-World Applications
Now that we've covered the basics, let's talk about some real-world applications of remote IO on Raspberry Pi. Here are a few examples:
Home Automation
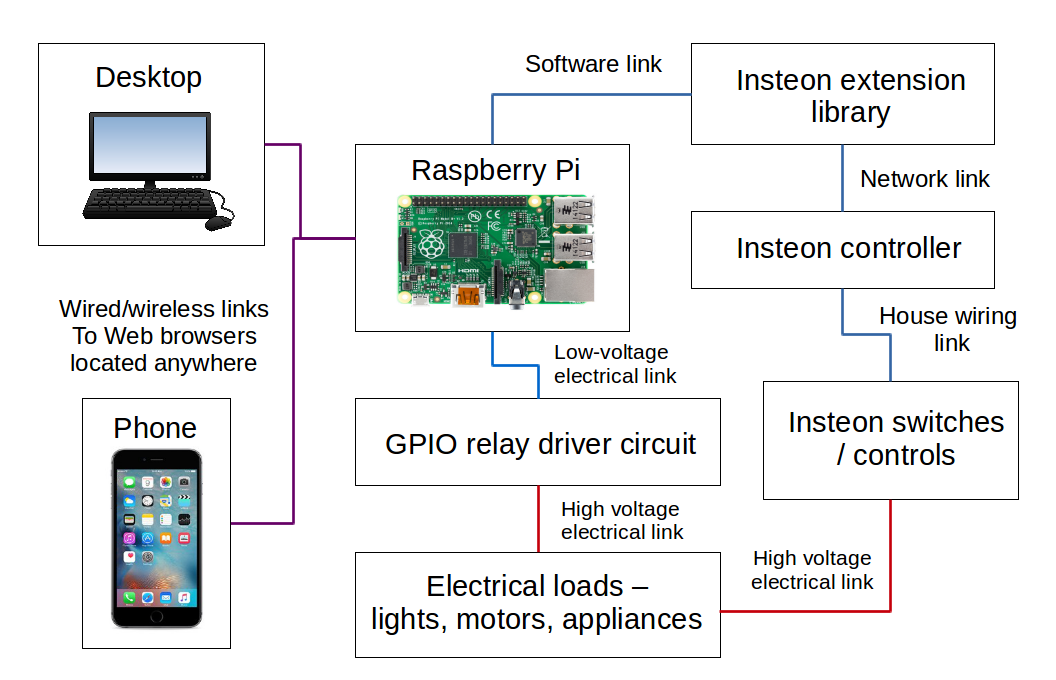
Home automation is one of the most popular applications of remote IO. With Raspberry Pi, you can control lights, appliances, and security systems from anywhere in the world. Imagine being able to turn off a light you left on or check your front door camera from your office. Cool, right?
Industrial Automation
In the industrial sector, remote IO on Raspberry Pi can be used to monitor and control machinery. This can lead to increased efficiency and reduced downtime. For example, you can set up a system to alert you when a machine needs maintenance or when production levels drop.
Future Trends in Remote IO Raspberry Pi
The world of remote IO is constantly evolving, and Raspberry Pi is at the forefront of this revolution. Here are a few trends to watch out for:
AI Integration
Artificial intelligence is becoming increasingly integrated into remote IO systems. With AI, you can create smarter systems that can learn and adapt to your needs over time. For example, an AI-powered irrigation system can adjust watering schedules based on weather forecasts and soil moisture levels.
5G Connectivity
With the rollout of 5G networks, remote IO systems are becoming faster and more reliable. This means you can control your devices in real-time with minimal latency. Imagine being able to control a drone from across the globe with just a few milliseconds of delay. The possibilities are endless!
Conclusion
Well, there you have it—a comprehensive guide to the best remote IO Raspberry Pi setup. From setting up your hardware and software to optimizing performance and exploring real-world applications, we've covered it all. Remember, the key to success with remote IO is experimentation and innovation.
So, what are you waiting for? Grab your Raspberry Pi and start building your dream projects. And don't forget to share your experiences and creations with the community. Who knows, you might just inspire someone else to take the leap into the world of remote IO!
Got any questions or comments? Drop them below, and let's keep the conversation going. Happy tinkering, folks!
Table of Contents